顯示具有 RHEL 標籤的文章。 顯示所有文章

5/26/2012

RHEL 5, 6 Disable IPv6


  1. 檢查IPv6目前是否有載入了.

    [root@rh6 ~]# lsmod | egrep 'ipv6'
    [root@rh6 ~]# ip addr show | egrep 'inet6'


  2. 編輯 conf 檔..有3個方法達成同樣的效果. (no-ipv6.conf 檔要自己建立)

    方法1:
    [root@rh6 ~]# cat /etc/modprobe.d/no-ipv6.conf
    alias net-pf-10 off
    alias ipv6 off

    方法2:
    [root@rh6 ~]# cat /etc/modprobe.d/no-ipv6.conf
    install ipv6 /bin/true

    方法3:
    [root@rh6 ~]# cat /etc/modprobe.d/no-ipv6.conf
    options ipv6 disable=1

  3. 編輯 /etc/sysconfig/network

    [root@rh6 ~]# cat /etc/sysconfig/network
    NETWORKING=yes
    HOSTNAME=xxooxp.blogspot.com
    GATEWAY=172.16.1.254
    NETWORKING_IPV6=off

  4. 關閉 ip6tables

    [root@rh6 ~]# service ip6tables stop
    [root@rh6 ~]# chkconfig ip6tables off

  5. 重新開機,讓設定生效.

    [root@rh6 ~]# shutdown –r now

  6. 確認重開機後,ipv6 就不會載入了.

    [root@rh6 ~]# lsmod | egrep 'ipv6'
    [root@rh6 ~]# ip addr show | egrep 'inet6'

11/27/2011

設定 Red hat Enterprise Linux bonding 介面.


設定Red hat Enterprise Linux bonding 介面流程如下:

  1. 確認主機上至少有兩張網卡.
  2. 編輯或新增4個檔案:
    1. 編輯 /etc/sysconfig/network-scripts/ifcfg-eth0
    2. 編輯 /etc/sysconfig/network-scripts/ifcfg-eth1
    3. 新增 /etc/sysconfig/network-scripts/ifcfg-bond0
    4. 新增 /etc/mdoprobe.d/bonding.conf
  3. 重新啟動網路服務.
  4. 確認 bond0 介面,是否啟用.
  5. 查看目前 bond0,使用之實體網路埠.
  6. 手動切換 bond0,使用之實體網路埠.

我們接著看每個步驟較詳細的設定/檢查方法.

  1. 確認主機至少有兩張網卡.
    [root@XXOOXp ~]# dmesg | egrep 'eth.:'
    e1000: eth0: e1000_probe: Intel(R) PRO/1000 Network Connection
    e1000: eth1: e1000_probe: Intel(R) PRO/1000 Network Connection

  2. 編輯或新增4個檔案:
    1. 編輯 /etc/sysconfig/network-scripts/ifcfg-eth0 的內容.
      [root@XXOOXp network-scripts]# cat ifcfg-eth0
      DEVICE=eth0
      BOOTPROTO=static
      MASTER=bond0
      SLAVE=yes
      ONBOOT=yes

    2. 編輯 /etc/sysconfig/network-scripts/ifcfg-eth1 的內容.
      [root@XXOOXp network-scripts]# cat ifcfg-eth1
      DEVICE=eth1
      MASTER=bond0
      SLAVE=yes
      ONBOOT=yes

    3. 新增 /etc/sysconfig/network-scripts/ifcfg-bond0
      [root@XXOOXp network-scripts]# cat ifcfg-bond0
      DEVICE=bond0
      IPADDR=192.168.75.55
      NETMASK=255.255.255.0
      ONBOOT=yes
      BOOTPROTO=static
      BONDING_OPTS="mode=1 miimon=50"

    4. 新增 /etc/mdoprobe.d/bonding.conf
      [root@XXOOXp modprobe.d]# cat bonding.conf
      alias bond0 bonding

  3. 重新啟動網路服務:
    [root@XXOOXp ~]# service network restart

  4. 確認 bond0 介面,是否啟用.
    [root@XXOOXp ~]# ip addr show bond0
    5: bond0: <BROADCAST,MULTICAST,MASTER,UP,LOWER_UP> mtu 1500 qdisc noqueue
        link/ether 00:0c:29:0f:d7:c6 brd ff:ff:ff:ff:ff:ff
        inet 192.168.75.55/24 brd 192.168.75.255 scope global bond0
        inet6 fe80::20c:29ff:fe0f:d7c6/64 scope link
           valid_lft forever preferred_lft forever

  5. 查看目前 bond0,使用之實體網路埠.
    [root@XXOOXp ~]# cat /proc/net/bonding/bond0
    Ethernet Channel Bonding Driver: v3.4.0 (October 7, 2008)

    Bonding Mode: fault-tolerance (active-backup)
    Primary Slave: None
    Currently Active Slave: eth0
    MII Status: up
    MII Polling Interval (ms): 50
    Up Delay (ms): 0
    Down Delay (ms): 0

    Slave Interface: eth0
    MII Status: up
    Link Failure Count: 0
    Permanent HW addr: 00:0c:29:0f:d7:c6

    Slave Interface: eth1
    MII Status: up
    Link Failure Count: 0
    Permanent HW addr: 00:0c:29:0f:d7:d0
    [root@XXOOXp ~]#

  6. 手動切換 bond0,使用之實體網路埠.
    [root@XXOOXp ~]# ifenslave --change-active bond0 eth1
    [root@XXOOXp ~]# cat /proc/net/bonding/bond0 | egrep 'Currently'
    Currently Active Slave: eth1

參考資料:

Network Card Bonding On CentOS (bonding 不同 mode 的說明)

8.2.2. Channel Bonding Interfaces

23.7.2. Using Channel Bonding

Bonding on Debian

[root@XXOOXp ~]# modinfo bonding

[root@XXOOXp ~]# man modprobe.conf


10/13/2011

如何檢查 RHEL 5.X and AIX 的網卡連接狀態?


How to check RHEL 5.x (or above) and IBM AIX NIC link status?


這個是滿實用的一個功能...

有時人不在機器旁邊又不確定線到底有沒有接,

又或是線到底有沒有感應到...就會派上用場了!


關於 RHEL 5.x (或以上),可透過下面的指令..

[xxooxp ~]# ethtool eth0 | egrep 'Link'
        Link detected: yes

或是

[xxooxp ~]# mii-tool –v eth0


而在IBM AIX上,可透過下面的指令

root@aix61 / # netstat -v | egrep '(ETHERNET|Link)'
ETHERNET STATISTICS (ent3) :
Logical Port Link State: Up
Physical Port Link State: Down
ETHERNET STATISTICS (ent2) :
Logical Port Link State: Up
Physical Port Link State: Down
ETHERNET STATISTICS (ent0) :
Link Status : Up
ETHERNET STATISTICS (ent1) :
Link Status : UNKNOWN


9/25/2011

AIX版的Linux watch指令...(監控指令的輸出狀態)


標題有些繞舌...不過不影響我們的主題需求...

Linux上有個好用的指令叫做watch,

能夠持續的監控指令的輸出狀態,讓系統管理員能夠隨時嘗握狀況。

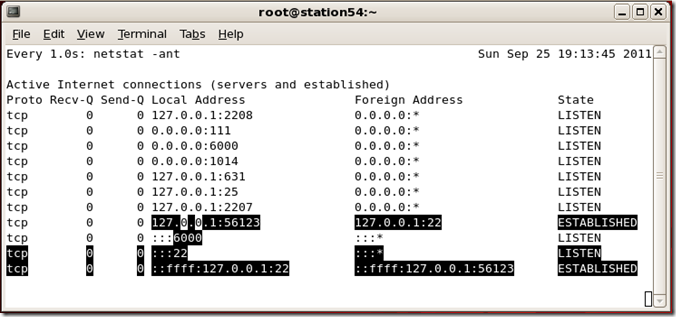
比方說我們想要監控 netstat -ant 的輸出狀況,隨時觀查連線狀態的變化。

則可以使用

# watch -d -n 1 ‘netstat –ant'

-n 表示每一秒更新一次輸出。
-d 表示將有變更的部份以高亮標示(Highlight)

輸出如下圖
image

很方便對吧!!

可惜...在IBM AIX上沒有這個好東西...( AIX上的watch指令是別的奇怪用途..)

不過別擔心! 因為這種問題在網路上早就一堆解答了...

這篇只是把他們整理一下,方便日後查找而已 ;-)

AIX 上的 watch 指令替代方案

其實也不難! 就是寫個迴圈來一直進行~

root@aix # cat watch.sh
#!/bin/ksh
#
# $1 = 監控的間隔時間,以秒為單位.
# $2 = 請將所有要輸入的指令以雙引號(")或單引號(')包起來.
#

# Exit the watch.sh use Ctrl + C
#

while true
do
  clear
  echo "Interval $1 sec, Command: $2"
  eval $2
  sleep $1
done
root@aix # #以下比方說要執行監控ls -l /home/user | grep .profile,每秒更新一次.
root@aix #
root@aix # ./watch.sh 1 "ls -l /home/user | egrep '.profile'"


參考資料如下:

Linux watch command on AIX?

Monitoring logs and command output


7/10/2011

vi 及 sed 置換字串的小技巧


工作中常常會需要將設定檔或script內的很多字替換掉,

當然這本身是一個很簡單的事情。

比方檔案內容如下:

[xxooxp@blogsopt ~]# cat xyz.txt
/uuu/abc
/uuu/abc
/uuu/abc
/uuu/abc

而我們想將 uuu 置換為 xyz 可透過簡單的幾個方法達成。

使用 vi 置換,
[xxooxp@blogsopt ~]# vi xyz.txt
/uuu/abc
/uuu/abc
/uuu/abc
/uuu/abc                                                      
~                                                                       
~                                                                       
:1,$s:/uuu/:/xyz/:g

使用 sed 置換

[xxooxp@blogsopt ~]# sed –i ‘s:/uuu/:/xyz/:g’ xyz.txt